Archive for March, 2010
Art is Where You Find It…and It Is Cheap
Posted on March 18, 2010. Filed under: decorating |
I have been so caught up with remodeling our Delaware beach house that I haven’t had much time or energy to blog. I took some photos the last time we were there. When I reviewed them I discovered that I had been able to create art for next to nothing. All of our budget is going to the remodel which leaves me with a great decorating challenge. I need to furnish and decorate 3 bedrooms, a bathroom and a great room (game room/television area). The goal is to spend as little as possible.
When we are done I will post pictures of the fully furnished space but fr now I want to concentrate on 2 of the 3 bedrooms.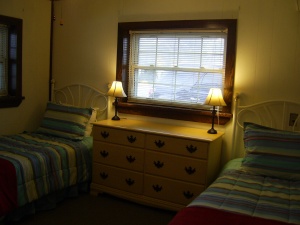
This picture shows you one of the new bedrooms. The headboards were $20 on Craigs List and the dresser was $40 on Craigs List. The lamps were part of a combo pack of lighting. Four lamps for $40. The bedding is Walmart (around $35 a set) and included everything (LOVE bed n a bag). The throws were about $10 each.
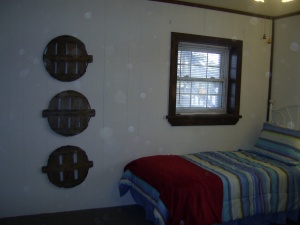
Now the other side of the room is where the creative art comes in. . .
These are . . .bushel basket lids. I got 6 of them for free on Freecycle. I am considering adding a stencil on the center cross-bar to add a little something. They might say “Sand, Sea, Sun” or “Dream, Relax, Inspire”. I might put the name of our beach house on the other 3 and hang them just inside the front door. “The Welcome Home”
The other bedroom on this level also got the frugal treatment.
The bed is an antique that was given to me by my neighbors it has a matching dresser. The night stands were on clearance for $24 each. The lamps are from the lamp combo pack. More Walmart bedding. The art was on clearance for $15. But wait! That’s not the creative, cheap art I refer to in my title. That would be these. . .
I apologize for the glare. These are pictures I printed for free from the site Vintage Printables. I have seen there items featured on other blogs and thought I would check them out. I chose images of shells (it being a beach house and all). The frames were from my local dollar store. So the entire wall of art cost a whopping $6.00.
I am really pleased with what I have been able to accomplish so far. I can’t wait to show you the final reveal. I found the absolutely most perfect couch (blue cotton duck with white piping) and it was only $100 on Craigs List!
We are going back to the Delaware beach house for spring break. We will be laying new floors, carpet and bringing in the furniture. My favorite part is about to begin! The decorating and fluffing.
I hope to share it with you all very soon.
“Til Next Time,
Make Yours A
Welcome Home
I am linked up with Thrifty Thursdays at Bloggeritaville and the Under $100 Linky Party at Beyond the Picket Fence and Strut Your Stuff Thursday at Somewhat Simple and Frugaliscious Friday at Finding Fabulous and It’s So Very Creative at It;s So Very Cheri and Made it for Monday at Between Naps on the Porch.
Read Full Post | Make a Comment ( 6 so far )Guest Post: Deep in 2×4’s and wood screws
Posted on March 6, 2010. Filed under: decorating, remodeling, renovating |
This post is brought to you by my handy hubby. He describes in detail the specifics of our construction project at the beach house.
Here is the other side of Jill’s post titled DIY Construction Progress at the Beach House.
As Jill’s post said we went to the BH for what I like to call Renovation Weekend. I had originally planned on bringing several of my handy buddies but all but one could not make that weekend so only my friend Paul joined us.
Our goals were to:
- Get the drop ceiling tiles out, and remediate the known water issue in that ceiling,
- Get the studding up to cover up the old brick wall (too many holes to make into a feature),
- Get the new wall for the 6th bedroom up including hanging the door frame,
- Build a step to fit the door opening and cover the concrete step,
- Fix the hole in the floor left by the removal of the kitchen island,
- Get electrical into the new walls and repair poorly done electrical.
Because of the length of this post I will break it into two parts.
Drop Ceiling Repair
This section of the house has a living room (about 25’ x 14’) we plan to break into two parts to work in a 6th bedroom. The living room has a drop ceiling that is pretty old. The prior owner, in his effort to not spend any money on anything, insulated the ductwork in that ceiling with insulation intended for walls and, worse, he tightly wrapped and taped the insulation to the ductwork. The problem this caused is that form of insulation is not intended to be up against ductwork that sweats. The sweating, over time, soaked the insulation, which was pressed up tightly on the bottom against the drop ceiling tiles. So, the ceiling tiles were sucking the water down from the wet insulation, making the tiles spotted and wet to the touch. Had we left this alone ceiling tiles would have started collapsing.
To remediate this, we pulled out all the ceiling tiles that were underneath ducts, which was most of them. We put on eye protection, ventilator masks and gloves, opened all the windows, got up on ladders and started ripping out the insulation directly into construction bags. We put any dry insulation into different bags then the wet insulation as we planned to recycle the dry stuff as wall insulation later. This took about 30 minutes for the two of us to do. We left the tiles out as we planned to build wall across this room and tie up into the rafters.
Studding to cover the brick wall
The living room mentioned above was actually added onto the house. When they did the extension they left the existing exterior brick wall and simply took out the exterior door (not the frame, just the door). They also left an exterior window! It looked very cheap. There was no way to make the brick a feature due to the large hole left the window and the door and even more damage once the door frame and side lights were removed.
We decided to stud walls in front of the brick to cover it up. This was actually a simple task to the left of the door (see picture) as all we had to do was build frames out of 2 x 4 studs, 16” on center, lift it in place and then put in cross braces that we used Red Heads to attach to the brick and secure the wall. The wall had to be slid behind the existing drop ceiling framing. We secured the wall on the left to an existing wall and down into the concrete floor using Red Heads.
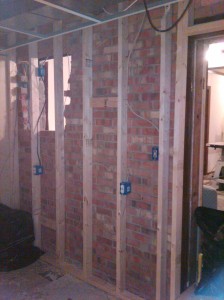 Breaking the wall into two parts was an interior doorway that used to be an exterior door and still had the exterior doorframe and sidelights. We had ripped out the exterior doorframe and sidelights on a prior visit. We built a new frame around the door opening to maximize the space while covering up the brick and other damaged areas.
On the right side of the doorframe we had a large heat duct to deal with and an old propane line. We had our plumber cut down and cap the propane line. We then built wall frames using 2 x 4 studs, 16” on center and added ½ x 2 pieces to the back of the frame to give us the space we needed off the brick wall to integrate the duct work seamlessly. We then used the same method used left of the door to attach the frames to the brick and the concrete floor. On the right side of this wall we had a 4-inch hip height bump out to deal with. We built a box to fit the space above it and attached that to the wall frame and the wall. We also had an exterior door in what would be the 6th bedroom that we wanted sealed up. We had to make sure the framing got around the exterior door we were sealing in while staying at 16” or less on center for the studs. Once we had the frames in place and attached on the right side, we stapled two large construction bags from beam to beam in front of the exterior door we were sealing up. We then took the wall insulation (dry) we had pulled out of the drop ceiling and stuffed it into the space between the plastic bags and the door (using the proper hand, eye and mouth protection). On the outside, to hide this door, Jill is finding two classic full-length shutters to cover the door. With this wall done we could work on the new wall to create the 6th bedroom.
New wall for the 6th bedroom
The living room mentioned in the Ceiling Repair section above, was to be split into two areas to create a 6th bedroom by adding a new wall and door. The challenges to building this wall were: tying into the ceiling rafters that were hidden behind insulation and many large ducts; tying into the wall to the right that has a hip height 4 inch bump out; repurposing an old door frame and cutting out a section of the drop ceiling support framing without bringing the whole ceiling down.
We cleared away the old carpet on the floor then measured and drew a line on the floor to represent where the wall would be. We then attached a 2 x 4 x 8 from a ceiling rafter and hung it to the floor, making sure it was tight against the floor. This beam was at the point where the left frame would meet the doorframe. Using a few small levels we got the beam perfectly level in both directions using a hammer to tap it into place.
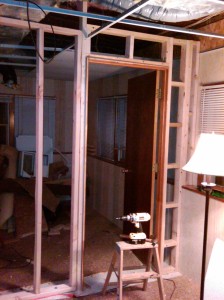 We then built a small frame for the area to the left of the door first, secured it to the new framing we built in the prior section and, on the right, to the beam we had hung from the rafters. Next, we built a small frame for the right of the doorframe, plus a thin box to get above the 4 inch hip height bump out. We attached these together and to the right wall. We then lifted the doorframe into place, put the door itself open to the back at 90 degrees resting on a 1 x 4 (holding it off the floor). We attached the doorframe with a few nails to hold it while we leveled the door. Using some shims, we worked to level the door and get the swing right. This took about 20 minutes of trial an error and was actually the easiest door hang we had ever done largely due to the beam we had hung from the rafters establishing a good level for the wall and door. Once the door was properly hung we completed attaching the frame, then added some RedHead anchors to secure the entire wall frame to the floor. Last, we ran two more beams from the top of the wall up into the rafters.
Part two of this Blog will discuss: building a step to fit the door opening and cover the concrete step; fixing the hole in the floor left by the removal of the kitchen island; and getting electrical into the new walls and repairing poorly done electrical.
I just linked up with Metamorphosis Monday at Between Naps on the Porch!
I just linked up wit Toot Your Horn Tuesday at Silly Little Sparrow
